Need help setting up Kodi on your Android TV streaming box, PC, or another device? If you are a beginner and don’t know where to start, this is the complete setup Kodi guide for you.
Our original Kodi setup guide for Kodi 16 Jarvis was one of the most popular posts on this site. Now, I’ve updated it for all of you Kodi 19 users. Don’t worry if you are using an older version of Kodi; this guide will still help you. The software under the hood is mostly the same.
The best thing about Kodi is that there are so many different options and tweaks you can do to make it your own – different skins, different backgrounds, and of course, third-party Kodi add-ons.
On the other hand, that also means Kodi can be pretty complicated – especially if you’re just getting started.
Kodi has a great community of Kodi users and developers, and there is the Kodi Wiki, as well. Those are going to be amazing resources as you get started, and even for tweaking your Kodi setup down the road.
For brand new users, though, finding your way around the forums can be challenging, and the Kodi community seems to assume quite a bit of existing knowledge that you won’t have yet.
This article should give you the basic information you need about Kodi to get set up and watch, and then you can take on the Kodi Wiki and forums to maximize your Kodi experience.
Download This Guide…FREE!
Download this guide...FREE!
Why pay for Kodi eBooks that don't tell you what you want to know. Download this 50+ page Kodi setup eBook...FREE!
How This Kodi Setup Guide Is Organized
If you’re starting from scratch, you can read this guide from start to finish and end up with a complete installation. If you’ve done some initial setup and want to improve it or see what you’re missing, you can use the hyperlinks below to jump to the sections you want and ignore the rest. It’s OK. My feelings won’t be hurt.
Keep in mind, though, that no matter what Kodi setup guide you read, you’re always going to want to tweak it a bit to suit your own needs.
Kodi works on lots of different hardware, and thus, there are many options and settings to change; there’s just no way to account for all of them, but if you follow this guide along with me, you’ll be well on your way.
Oh…and don’t worry about making any mistakes along the way. You can always reset Kodi and start with a clean slate if you mess up.
Information You (May) Want To Know
I mentioned earlier that Kodi works on many different systems: Android, Linux, Windows, and Mac to name a few.
To make writing this Kodi setup guide easier for this website’s audience, I have used screenshots from an Android TV box. Don’t worry, the interface is pretty similar regardless of what kind of hardware you are using.
[tweet_box design=”default” float=”none”]The best thing about Kodi is that there are so many different options and tweaks that you can do to really make it your own.[/tweet_box]
What Is Kodi?
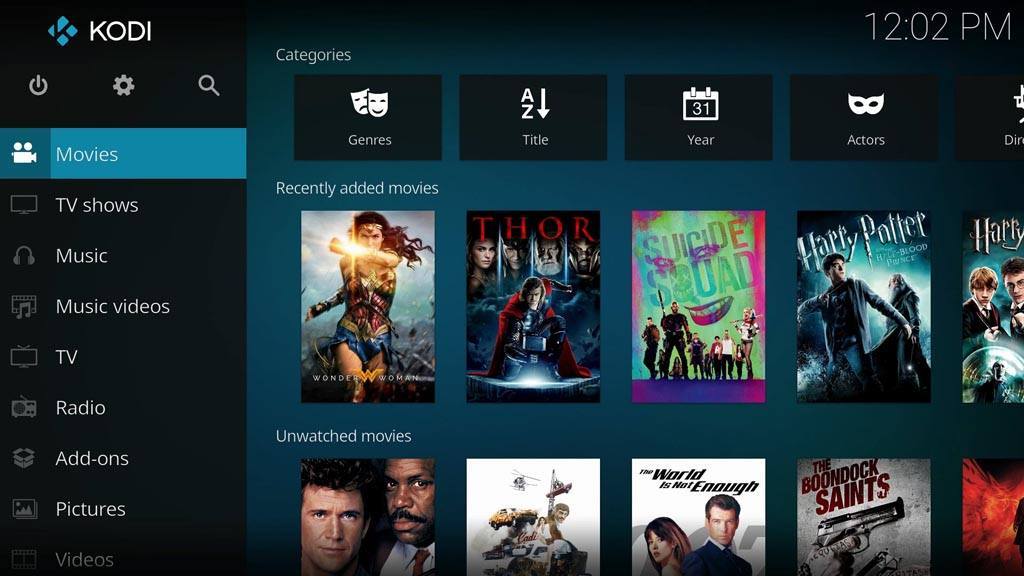
Kodi, which used to be called XBMC, is an open-source media center that grew from an amateur project to play content on the original Xbox. If you’re good with acronyms, you’ve probably already figured out that XBMC originally stood for Xbox Media Center.
It is designed to be used from your living room couch, so you’ll often hear that Kodi has a “10-foot user interface.” It allows Kodi users to play almost any file format for video, music, podcasts, and images on your TV, no matter where you store them.
If you’re wondering how the nicknames for each version come about, Kodi versions have usually been named after popular sci-fi, comic books, or generally geeky references:
- XBMC v8.10 Atlantis (2008) – (Stargate)
- XBMC v9.04 Babylon (2009) – (Babylon 5)
- XBMC v9.11 Camelot (2009) – (King Arthur mythos)
- XBMC v10.0 Dharma (2010) – (Lost)
- XBMC v11.0 Eden (2012) – (Garden of…)
- XBMC v12.0 Frodo (2013) – (Lord of the Rings)
- XBMC v13.0 Gotham (2014) – (Batman – my personal favorite)
- Kodi v14.0 Helix (2014) – (Helix TV show)
- Kodi v15.0 Isengard (2015) – (Tolkien)
- Kodi v16.0 Jarvis (2016) – (Tony Stark’s artificial intelligence)
- Kodi v17.0 Krypton (2017) – (Superman’s homeworld)
- Kodi v18.0 Leia (2018) – (Star Wars)
- Kodi v19.4 Matrix (2022) – (The Matrix)
More than just playing your files, Kodi brings in information from online databases, such as IMDB, to automatically categorize your music and provide blurbs, actors, directors, and further information. This means better searching and browsing.
Kodi also works a bit like an independent OS, in that you can download apps for Kodi, called add-ons, that can do a huge variety of things. They can give you regular weather updates, create smart photo carousels for your home screen, play live radio or TV, and search the internet for available streams of the hottest content. This is where Kodi gets excited.
Yes, you have read that correctly. With Kodi, you can get access to streams of the latest content including new releases. And no, you don’t need a subscription to a premium subscription service to access them. Is that legal? Well, while we can certainly argue that it is a gray area, the answer is almost certainly no.
While Kodi itself is legal (it is just media center software), if you choose to use Kodi to access copyrighted content without paying for it, then it is probably illegal. If you do choose to use Kodi in this way, make sure you use a VPN to protect yourself. More on this below.
What’s Changed In Kodi 19?

The main upgrade that you can expect with the Kodi 19 Matrix over the Kodi 18 Leia is better quality video and audio playback, which is a top priority for most streamers.
There are also some improvements to the music library feature as well, as Kodi now brings in album release dates, album duration, multi-disc sets, and more detailed tags. Kodi has done this well for movies and series for several iterations, and now music lovers can expect the same level of functionality.
Are you ready to set up Kodi?
Download & Setup Kodi
Depending on what device you’re using, you’ve got several different options for installing Kodi. No matter what, you can always find all of the latest versions on the official Kodi download page at: https://kodi.tv/download/ (shown below).
While we always recommend downloading the latest version of Kodi, older versions are also available on the site if you want to stick to an older version for any reason.
For Android TV box users, for a long time, Kodi was not available in the Google Play Store so it was necessary to sideload the app. Kodi is now officially available via Google, so you can download and install the app from the Google Play Store like any other.
If you are using a locked-down Android TV device, like a Fire TV Stick, then you won’t have access to Kodi in your app store and you will need to sideload the app using Downloader. You can read our complete guide to installing Kodi on the Fire TV Stick (and other devices) using Downloader here.

Once you’ve installed Kodi, it’s time to learn how to navigate the interface.
How To Use Kodi/XBMC
Since this is probably your first time setting up and installing Kodi, I’ll touch briefly on how to navigate around the Kodi user interface, or “UI.”
Remember when I said earlier you’ll hear the words “10-foot user interface” quite a lot? Here’s what that means:
The older versions of Kodi had their main controls laid out in a ‘ribbon’ along the center of the screen and were configurable to a certain extent. Kodi 17 introduced a new Kodi skin (or theme) that aligned everything along the left-hand side of the screen to match the layouts of Netflix and Plex, and this continues in Kodi 19.
The main menu includes the following categories by default: Videos, Movies, TV Shows, Music, Music Videos, TV, Radio, Pictures, Add-ons, and Weather. (Whew. Try saying that in one breath.)
This is the default interface, but you can also add “skins” to Kodi which will change the user interface. These can make Kodi look very different, but there are so many that in this guide we will focus on the default interface since we can’t reference them all individually.
Context Menu
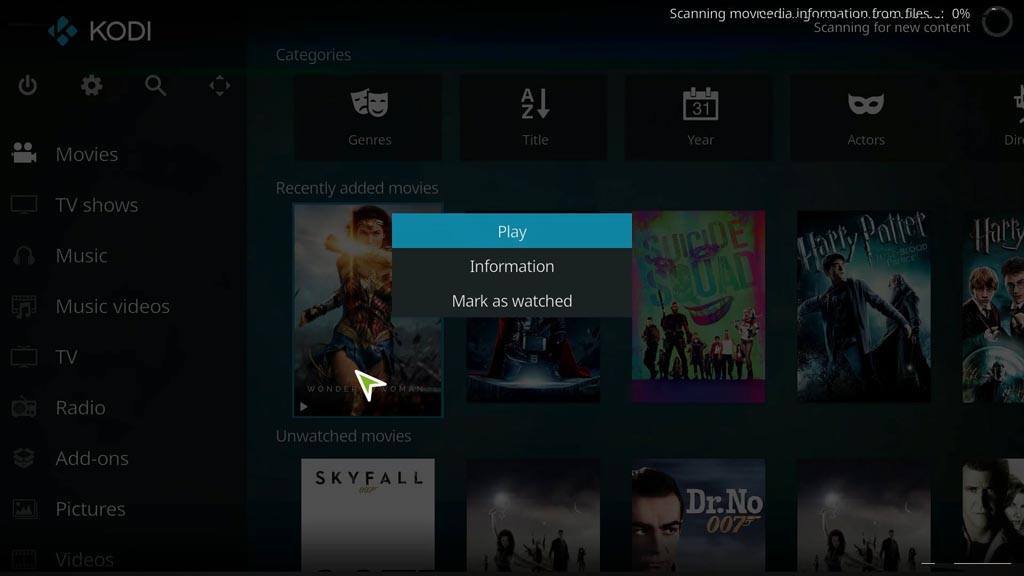
The Context menu will provide extra functionality depending on what screen you’re on when you click it. For example, in the image on the left, I brought up the context menu for the movie Wonder Woman. Here, the context menu gives us the option to play the video, mark it as “watched,” or pull up additional information on the movie.
On other screens, the options you see will be different depending on what makes sense for that media type.
How to pull up the Context menu depends on what type of device you’re using Kodi on:
- Android: Long Press
- Mouse: Right-click
- Keyboard: ‘C’
- Amazon Fire TV: Menu button
- NVIDIA Shield controller: ‘X’ button
Kodi Setup Guide: Video Library
One of the most important steps in setting up Kodi is creating your media library; let’s start by adding videos. If you haven’t ripped your movie collection to your hard drive, you’ll need to do that first. Check out my tutorial on DVD and Blu-ray ripping with MakeMKV.
Before you start adding every file on your hard drive, though, there’s some prep work you need to do first.
Kodi expects media files to follow a certain format, and that format varies based on things like whether your file is a movie or a TV show. If the file name isn’t listed correctly, Kodi may not be able to tell what it is.
Why does that matter? Well, Kodi uses a process called scraping to pull data from the file. If Kodi isn’t able to scrape correctly, then it may do one of two things: It may ignore the file and skip over it when creating your library; or worse, it could mistake the file for a completely different movie.
You will want to put some thought into how your library is organized so that it makes sense to you, but if you follow these simple guidelines it will be easier for Kodi to figure out what’s in your library.
How To Organize Your Media Library
There are two common ways to organize your media folder:
- One folder containing all of your media files
- Each movie or TV series in its folder
It’s your choice how you want to organize your media library. There are pros and cons to each method, and that’s a topic for another article, but I will offer this piece of advice. If you have a larger library, it will be easier to manage if each movie is in its separate directory.
How To Name Movies
If you choose to use subfolders, movie folder names should include only the title and/or the year.
Tip: To improve the scraper’s performance, add the year in parentheses to the end of the folder or file name.
\Movies\Avatar(2009)\somefilename.mkv
\Movies\The Usual Suspects(1995)\somefilename.avi
How To Name TV Shows
If you’d prefer to have one folder for all of your media files, you would include the same information in the same order but you would change the filename rather than the folder name.
\TV Shows\House (2004)\Season 1\House.S01E01–Everybody Lies.mkv
\TV Shows\12 Monkeys\Season 1\S01E01 Splinter.avi
How To Add Movies To Your Library
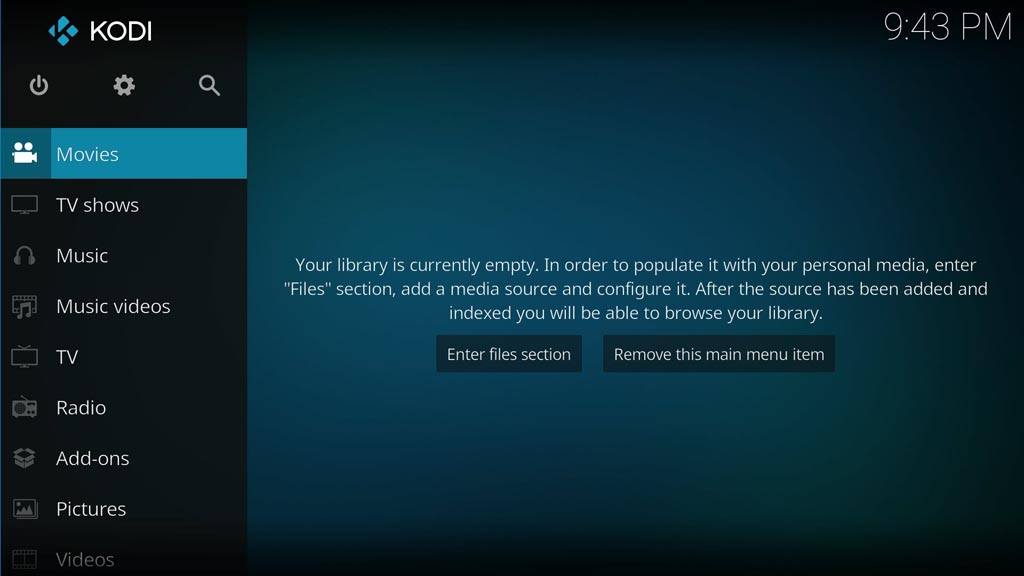
Kodi uses the same general process to add Movies, Music, or Pictures to your media library. There are differences, of course, but the three processes all start the same.
Start by scrolling down to Movies on the menu. Once you’re there, click the button that says Enter Files Section. If you don’t have anything in your library, it will take you directly to the screen below.
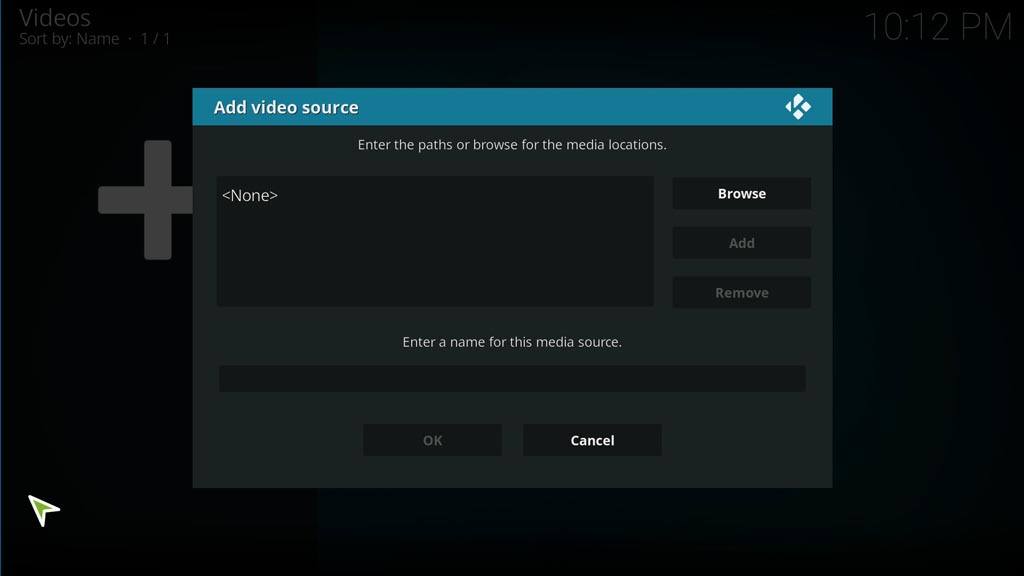
If you know the path of your media server, you can take a shortcut and enter it directly in the box here. I’m going to assume you don’t have that memorized, though, and in that case, you’ll need to Browse for it.
Depending on how your media server is set up, you’ll have a couple of different options here.
Kodi doesn’t care if you’ve got your media files on a Windows PC on your network, a dedicated Network Accessible Storage (NAS) device, or simply an external hard drive that has one folder with hundreds of movies on it. Kodi will figure it out.
For this article, I’m going to assume you’ve already set up your server how you like it. The most popular option for home servers is some sort of Windows Network (SMB), so that will be the one we discuss here.
You’ll also have the option to add files from an external storage device, usually a flash drive or an external hard drive. Another popular option is via UPnP (Universal Plug and Play), but there are some inherent security risks with UPnP, so I don’t recommend using that method if it’s avoidable.
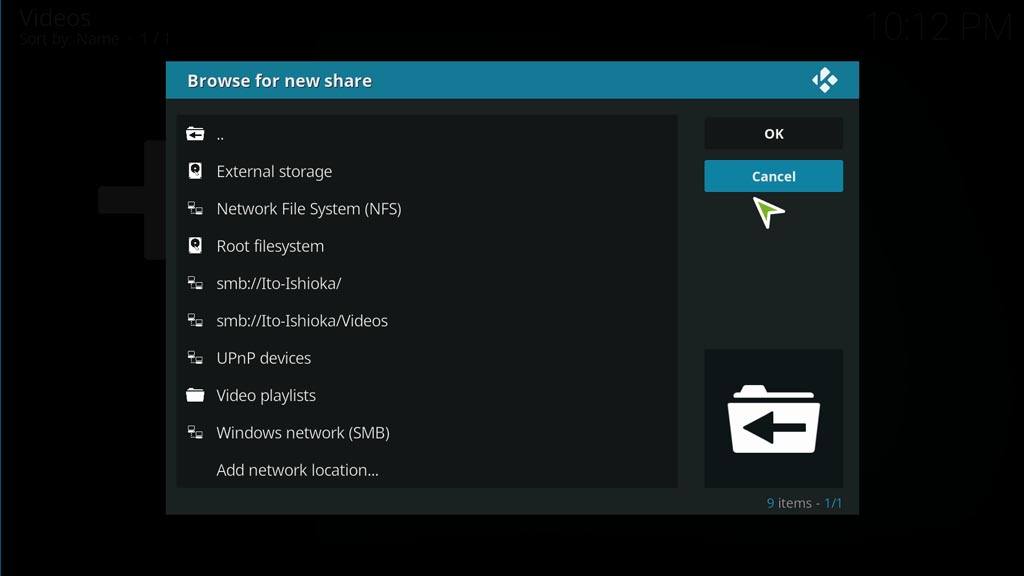
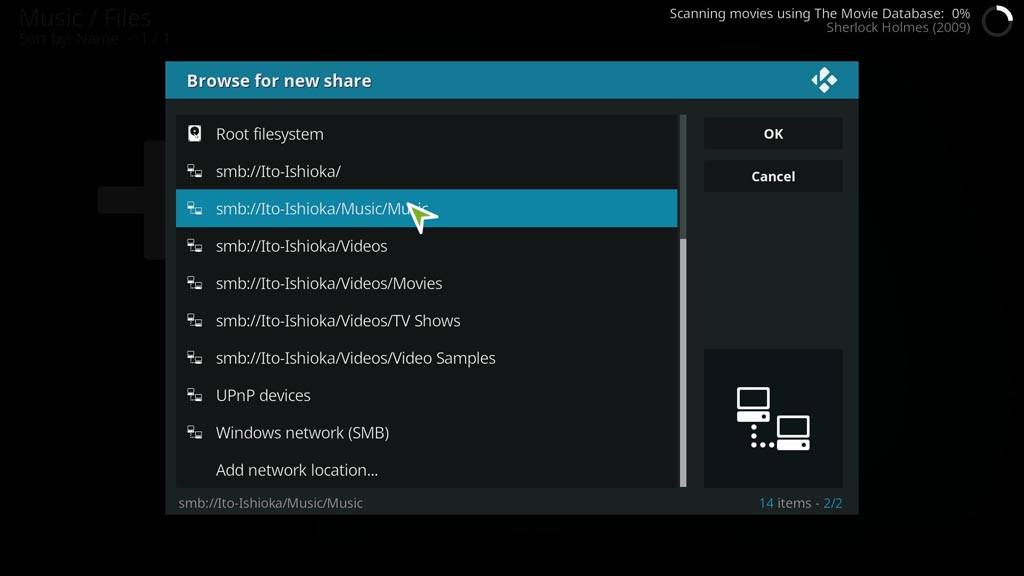
My network devices are named after characters, places, or things in movies. In this case, they’re characters from Big Hero 6. No judging, please.
Since I’ve already added some shares, you’ll see my external NAS listed here along with some subfolders. If your storage device doesn’t populate, you can click “Add Network Location” at the bottom of the list.
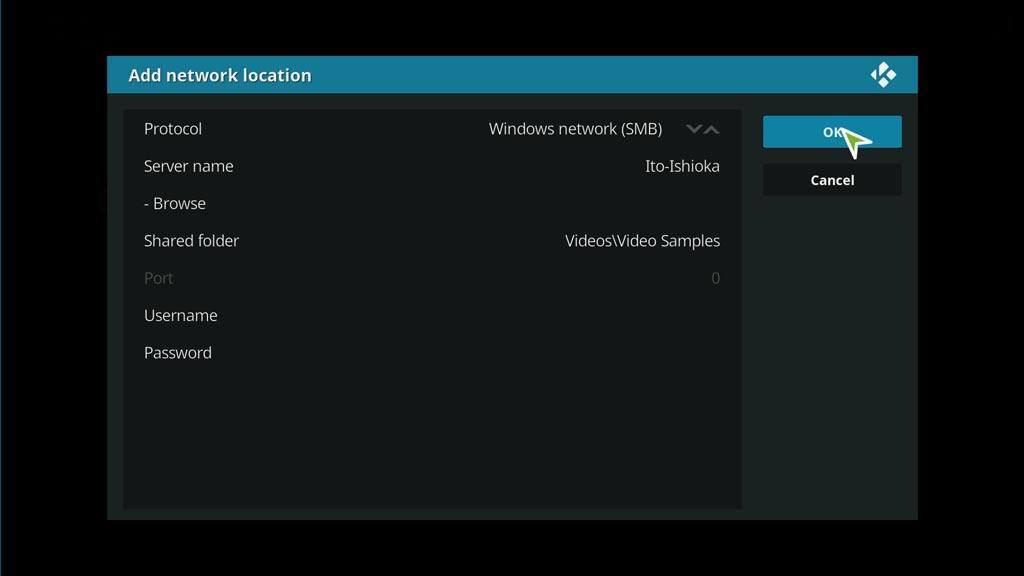
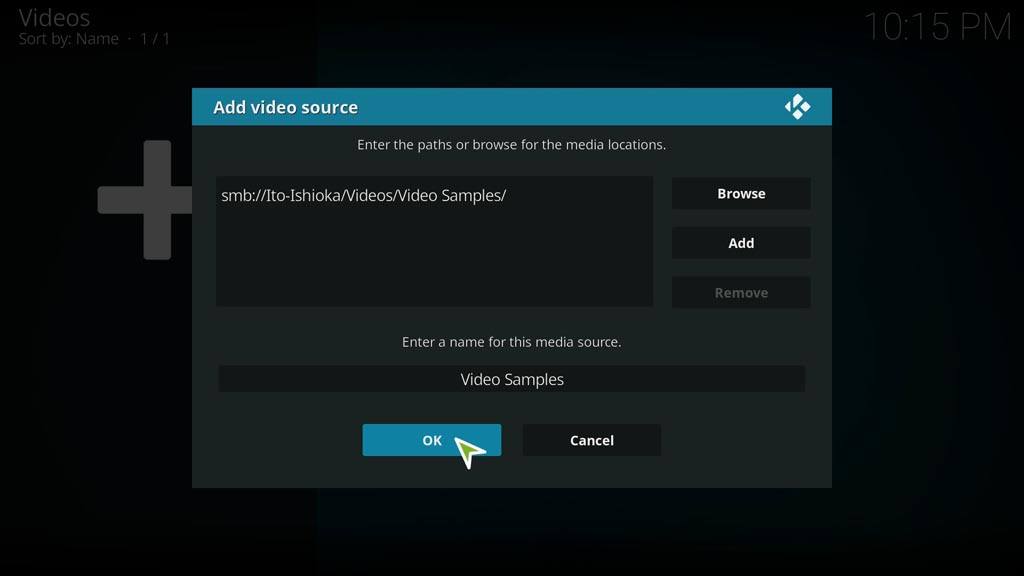
In this case, I’m adding the “Video Samples” folder, which is inside the “Videos” shared folder.

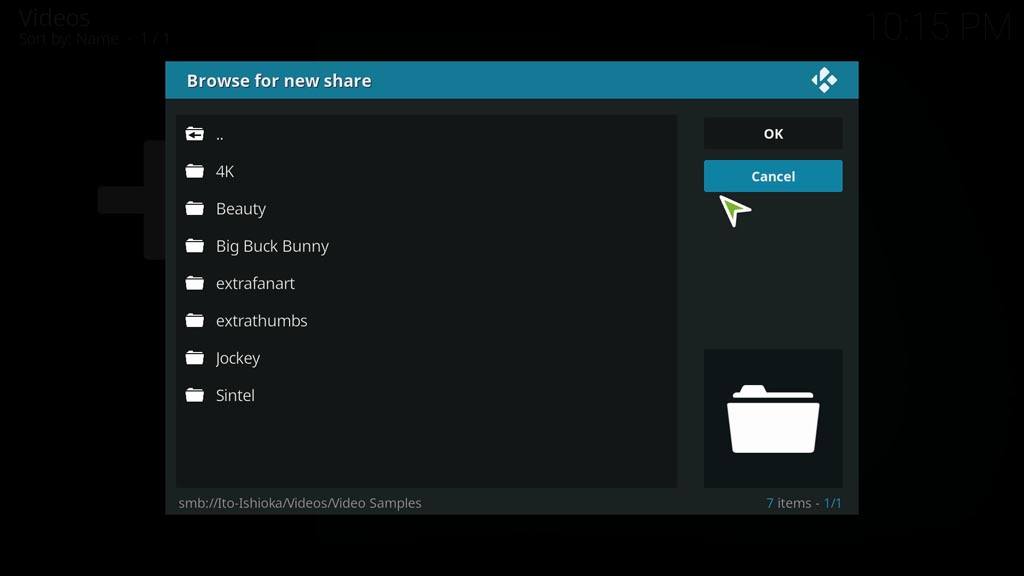
The way my files are set up, this is as far down into the file structure as I want to go. In each sub-folder underneath, there is a different video title. As you’ll see later, there are multiple versions of the videos in each folder, so there will be some duplication.
A good rule of thumb is to go as deep into your folder structure as you can, but not too far that you lose videos. Remember, Kodi can be seen in the current folder and any sub-folders below. It won’t look in the folders higher than whatever folder you’re in.
Once you’ve decided on your folder, click OK.
That will take you back to the Add Video Source window and add the file path to your media server in the box.
By default, Kodi will choose the folder name as the name for the share, but you can change the name of the share in the Enter a Name for the Media Source box.
Once you’ve chosen the folder, the next step is to tell Kodi what type of files are in the folder and to set some options for the Scraper.
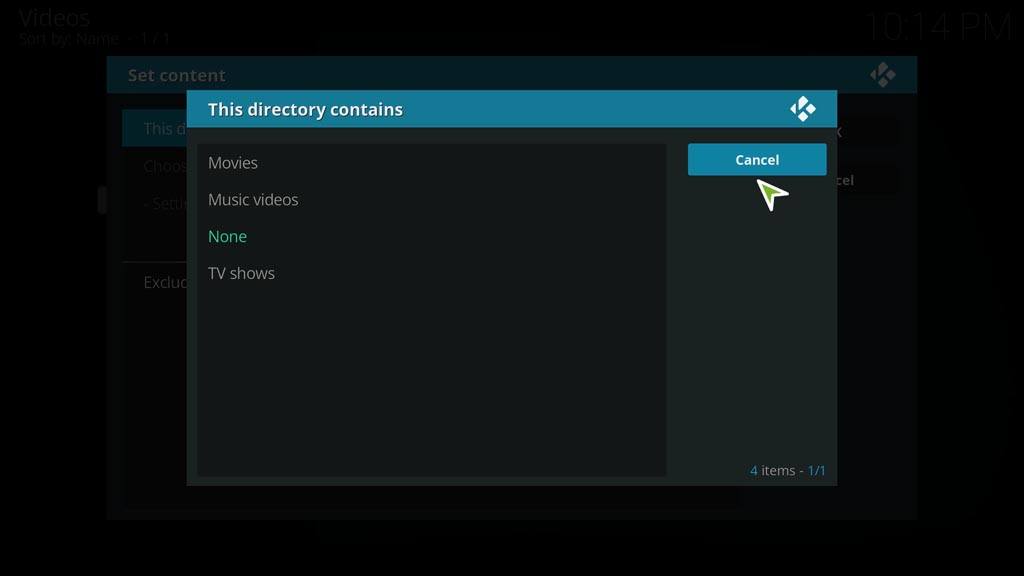
This window is split into three parts. In the upper-left section, there’s a dropdown box titled This directory contains. The options here are:
- Music Videos
- Movies
- TV Shows
- None
Once you make a selection, you’ll have one or more options in the Choose a Scraper section in the upper right.
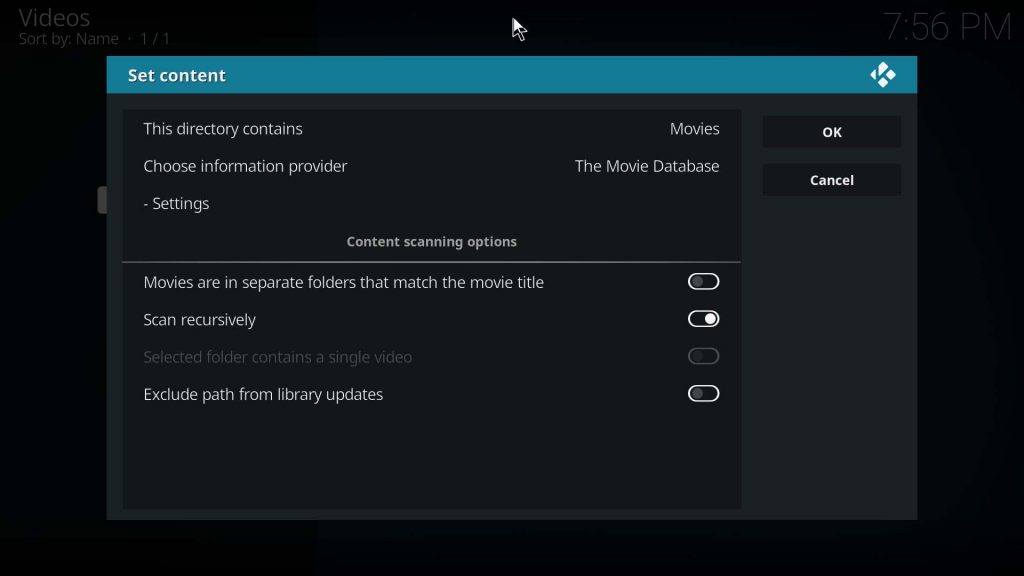
In this example, I’m adding a folder of movies, so I’ve selected that from the drop-down box. Because of that choice, there are some Content Scanning Options in the bottom half of the window.
Remember when you set up your media library in the How to Name Movies section? Here’s where that choice is going to come into play.
Under the Content Scanning Options header, the first option is whether or not Movies are in a separate folder that matches the movie title. If your files are all in the same folder, leave this unchecked. If, instead, you have your movies in separate folders, make sure this option is checked.
The second option to Scan recursively is one I always check. This will force Kodi to look in any sub-folders for new files.
Depending on what scraper you use, there may be additional options listed under the Settings button at the bottom. These options determine whether or not Kodi will keep the original title, enable fanart, and trailers, or where to get ratings from. Click OK when you’ve made any changes.
The final step is for Kodi to start scanning your new folder share and adding the videos to the library.
Thankfully, Kodi will let you move on to do other things while the scanning process does its thing. The only status bar you’ll see is in the very upper right-hand portion of the screen. Be warned: If you’ve got a rather large library, this process could take a long time. Once it’s done….
Your individual titles will have a full-color background image, poster art, and some basic information such as the resolution for each video, depending on what options you’ve chosen and what Kodi skin you’re using.
Back on the main Kodi home window, you’ll see thumbnail views of the last five movies you’ve added to your library above the center menu ribbon. In theory, if you’re consistently adding videos to your library these will be the files you’ll want to watch first.
There are a lot more tweaks and settings to help you get the most out of your videos, but let’s look at adding some music to Kodi next.
How To Setup Kodi: Music Library
Adding music to your library is the second biggest part of your Kodi setup. As of Kodi 16 Jarvis, it now follows a similar process as adding videos above, but that wasn’t always the case.
New Music
Before Kodi 16, there was a definite difference between how you used the Music and Video Libraries. For some reason, scanning files into your Music Library was a two-step process, unlike the automatic scanning available in the Video Library. You had to manually pull up the context menu and select Scan to Library.
Now, the system will ask you if you want to scan all the files in the folder immediately after you add a new source – just like it does for the Video Library.
Advantages
Kodi first announced the new Music Directory in December 2015 in a blog post on Kodi.tv. They listed quite a few enhancements, which I’ve highlighted below:
- A library view consistent with Movies and TV Shows
- Music file searching enabled
- Library splits up the music into sections: Genres, Artists, Albums, Singles, All songs, Years, Top 100 (based on your playback), Recently Added/Played Albums, and Compilations
- Ability to use Smart Playlists to further filter
- Rate your music and filter based on that rating
- Share music over your home network provided that the clients support UPnP
- Scan for additional information like artist biography or album review/synopsis using the Context menu in the album or artist library
This can be enabled by default in Settings -> Music -> Library -> Fetch additional information during updates
Tagging Music In Kodi
In the Video section, I mentioned that Kodi needed files to be in a very specific format for the scrapers to figure out what the files were. The same holds for your Music Library.
Unlike Videos and TV shows, Kodi doesn’t look at the file names themselves; it looks at the ID tags embedded in the file.
What this means is that each file (song) must have:
- ID3v1,
- ID3v2.3,
- ID3v2.4,
- Vorbis Comments,
- APE tagging.
If the files aren’t tagged, Kodi won’t be able to figure out what the song is.
Why Tagging?
If you think about it, this makes sense. When you look at a movie, you only need a combination of the movie title and the year to figure out what the movie is. For example, Transformers (1986) is very different from Transformers (2007), but with those two pieces of information, you can easily determine which is which.
With music, it’s much harder. A song can have live and studio versions of the same song, acoustic or full band versions, and even karaoke versions – sometimes all on the same album. Or worse, different artists can release different songs with the same title in the same year.
How can Kodi figure it all out without making the file names incredibly huge?
That’s where tagging comes in. Tagging embeds information in the file itself including Artist, Album, Year, Track Number, Genre, Length, and Bit Rate. Tagging can even hold information on the beats per minute or the rating of the song.
What if your music files aren’t tagged?
I’m not going to say it’s an easy thing to fix, but some programs can help you with the process. I’d suggest looking at MusicBrainz Picard or Mp3Tag.
How To Add Music To Your Library
Because the new Music Directory is modeled after the Video library, this will hopefully look very familiar if you’ve been following along. If you haven’t been following along….why not? 😉
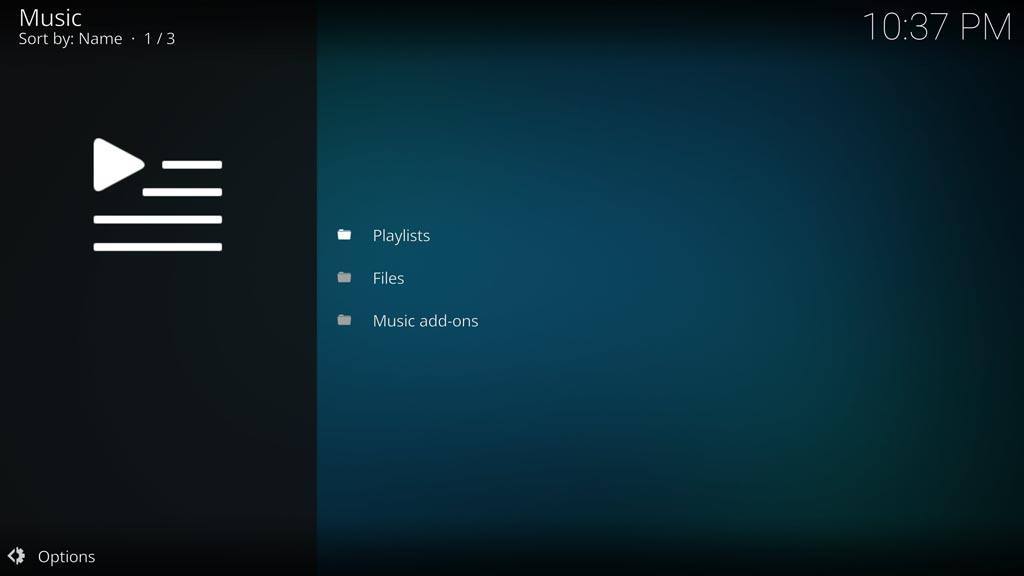
Start by scrolling down to Music on the side menu. The submenus underneath Music may look different than the screen on the left; this image is from a fresh installation with no music files whatsoever.
If that’s the case, Kodi is smart enough to realize you’re either going to want to install a music add-on or set up your library. There’s no need for it to show any additional information such as Artists, Albums, Songs, or Libraries since they don’t exist yet.
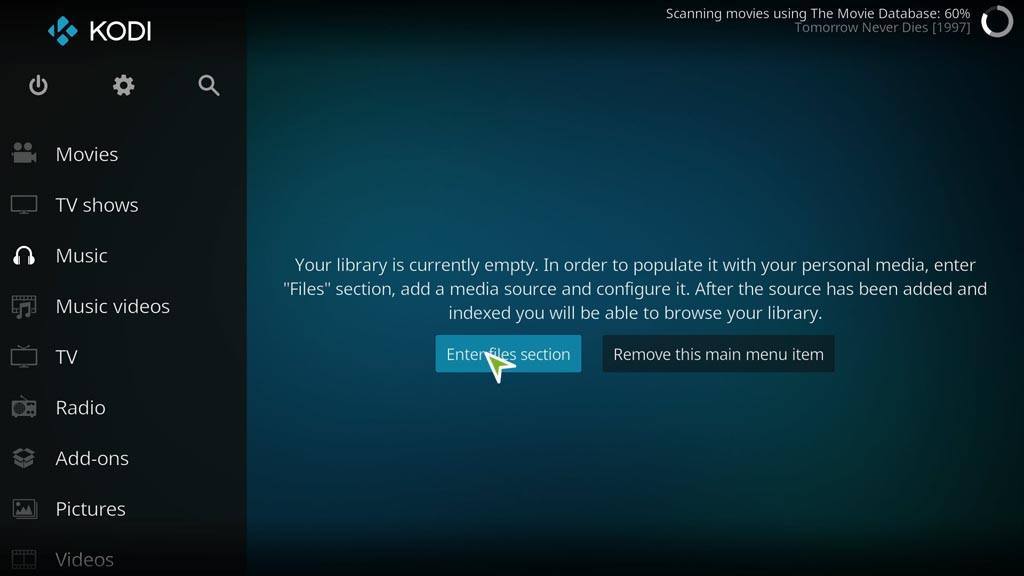
Whether you have nothing in your library yet or you want to add files to an existing library, click Enter Files Section to continue. If you already have done this and you don’t have anything in your library, it will take you directly to the screen below.
Either way, we’ll be going to the Files section to set up your music library.
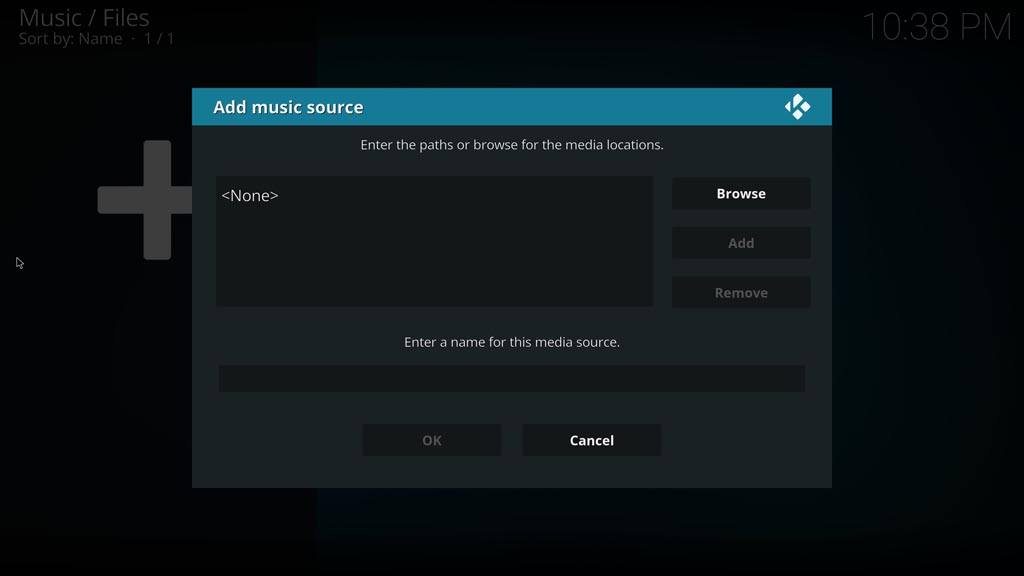
Depending on how Kodi is set up on your network, your shares may appear in this menu. If you know the path of your media server, you can take a shortcut and enter it directly in the box here. If you don’t know the path, you’ll need to Browse for it.
If you already have some files set up, there will be a list of folder shares in an intermediate menu before this with an option to Add Music. I covered folder shares in the Video section above, but just in case you skipped that section, I’ll touch on it again in a little bit. As you can see below, the shares I set up in the previous section are listed here.
My music is stored on the same NAS (Network Accessible Storage) server as my movies, so I’ll select Windows Network (SMB) to continue. Depending on how your network is set up, you may have your files stored on an external drive or even a UPnP server somewhere else on the network.
Since I know the name of my NAS server, I’ll select it from the list.
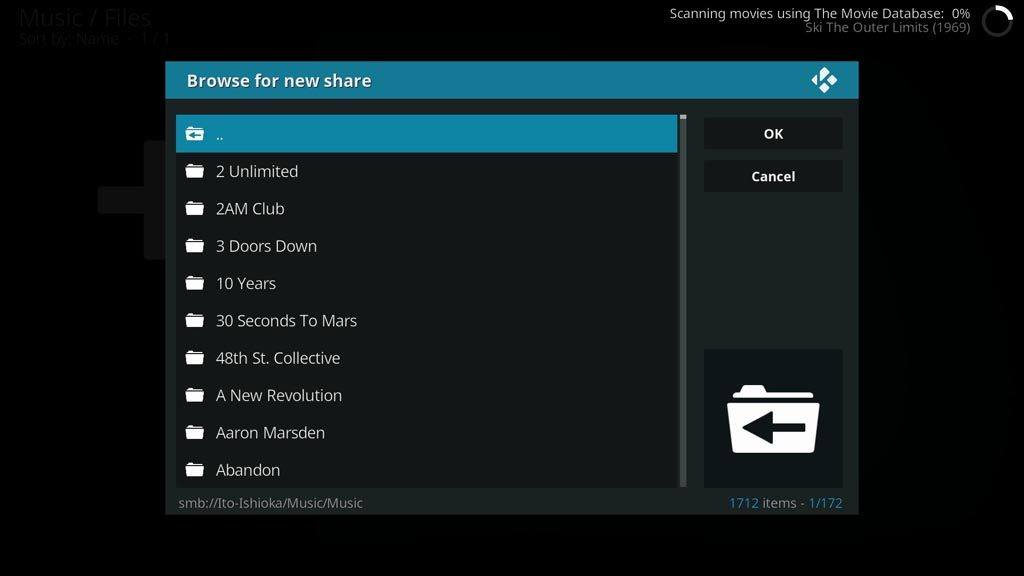
Once I select a device, Kodi then looks at any folders it finds and asks where my music is located. In this case, I only want to go one more level down, since that’s where the Artist sub-folders are located. As you’re navigating through your folders, Kodi will keep updating the file path at the bottom of the screen.
Once you get as far down as you want, click OK.
That will take you back to the Add Music Source window and add the file path to your media server in the box.
By default, Kodi will choose the folder name as the name for the share, but you can change the name of the share in the Enter a Name for the Media Source box.
As I mentioned earlier, one of the big improvements to the Music Library is that it will automatically ask you if you want to add media from this source to your library. Unless you’re adding multiple folders and want to scan at the end, I would always select Yes.
Scanning your Music will usually take considerably longer than scanning your Video Library. Most of us have libraries with several thousand songs in them, and that can be time-consuming to scan and index. Be patient here.
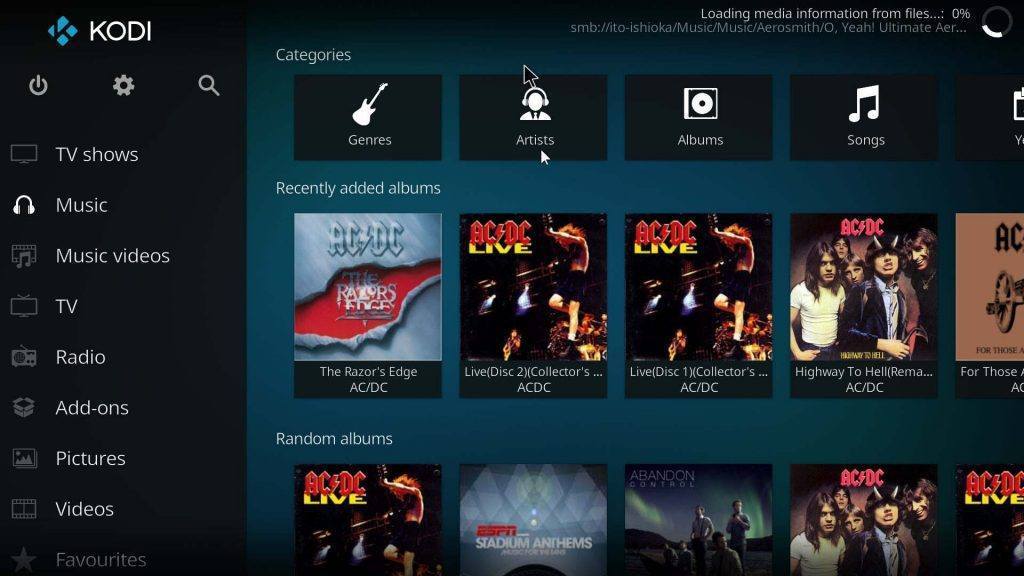
Once Kodi finishes, you’ll find the recently added albums on top of the main ribbon on the Kodi home window.
Kodi Setup Guide: Images

Kodi does a lot more than just play movies and music. Kodi can also take your photo library for a spin too.
There isn’t as much functionality included in the picture viewer, mostly because there isn’t a whole lot you can do with images out of the box. That being said, there are quite a few great Kodi add-ons to help put a little spice into your image library.
Adding Pictures To The Library
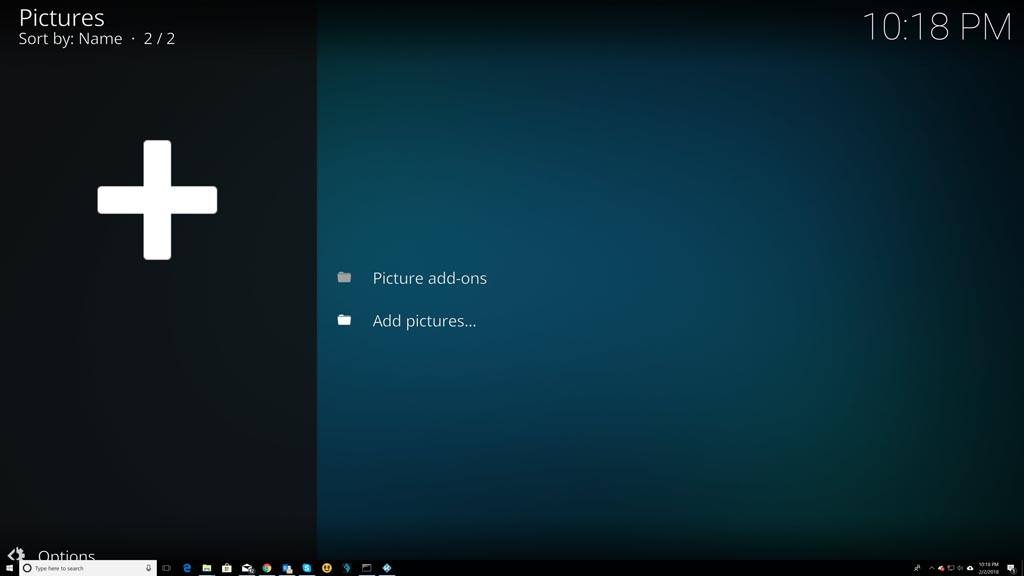
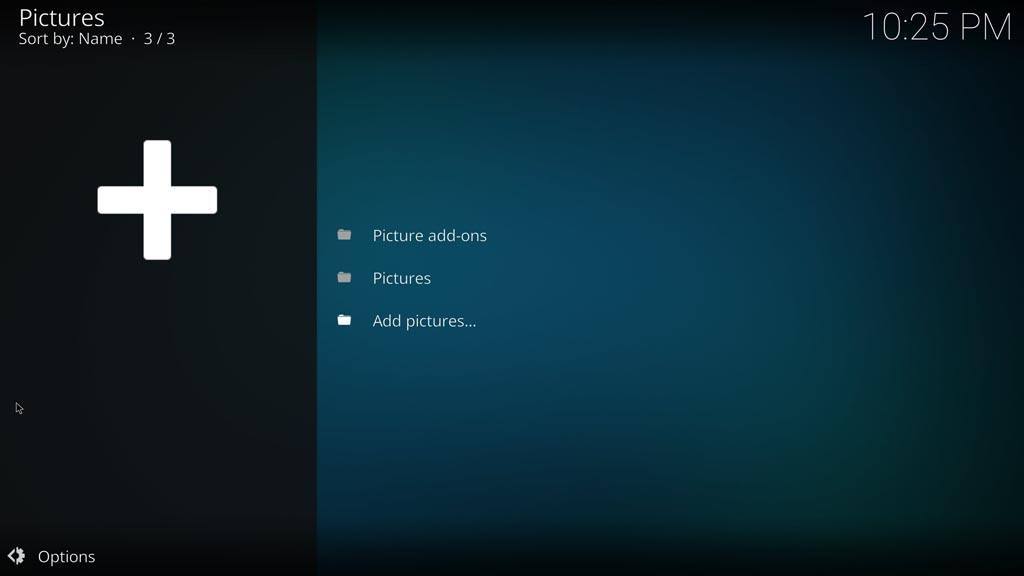
If you’ve added music or movies to your library, this is going to look very familiar. From the Kodi home screen’s ribbon, scroll over to the Pictures option. Here there’s only one sub-menu listed below for any Add-ons you want to install. That’s not what we’re looking for, so click on the main Pictures option instead.
Just as with Movies and Music, you can install Kodi add-ons and add files to your media library on this screen. Also, when you do have pictures in your library, their folder names will be listed in this menu as well.
Unlike the Movies and Music tabs, the Pictures menu is much simpler. In fact, all you can do on this page is add pictures to your library or install an add-on.
Let’s walk through how to add pictures to your Kodi media library. As you can probably guess, you’re going to want to click on Add Pictures… to start the process.
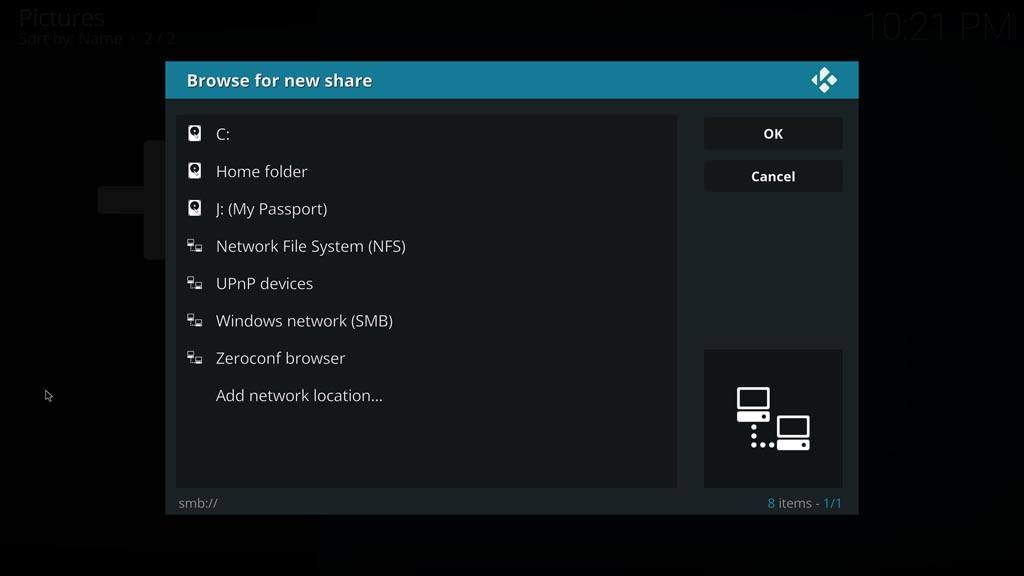
By now, Adding a Source should look familiar. If you know the file path, you can enter it in the text box, or click Browse to search for it.
All of the drives your Kodi installation can detect will be listed here.
My pictures are stored on a Western Digital MyCloud Network Accessible Storage (NAS) device, which could be found in one of three ways, depending on how I set it up:
- Network File System (NFS),
- Universal Plug and Play UPnP devices,
- or Windows network (SMB).
In my particular Kodi setup, it’s configured as a Windows network (SMB) device.
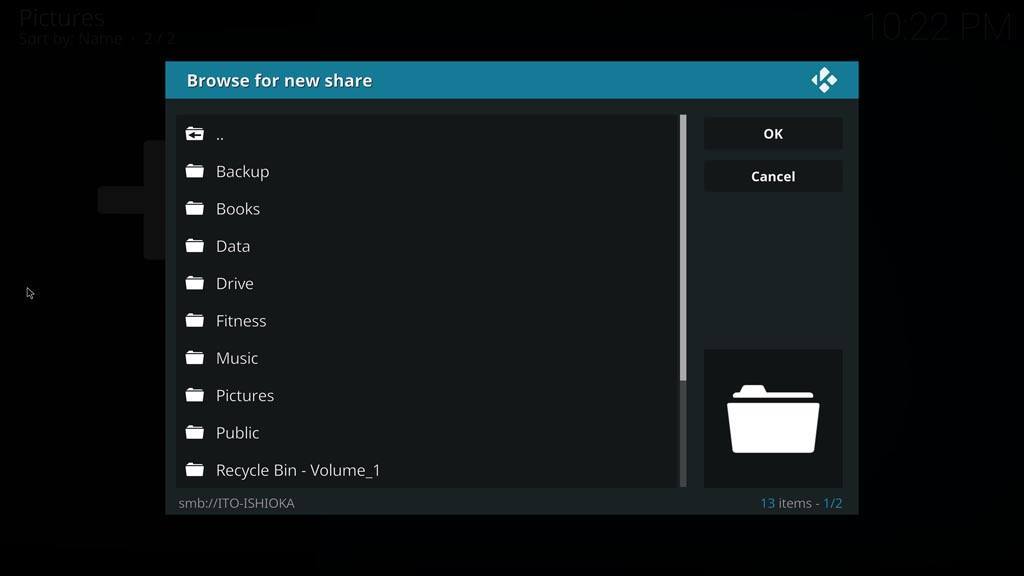
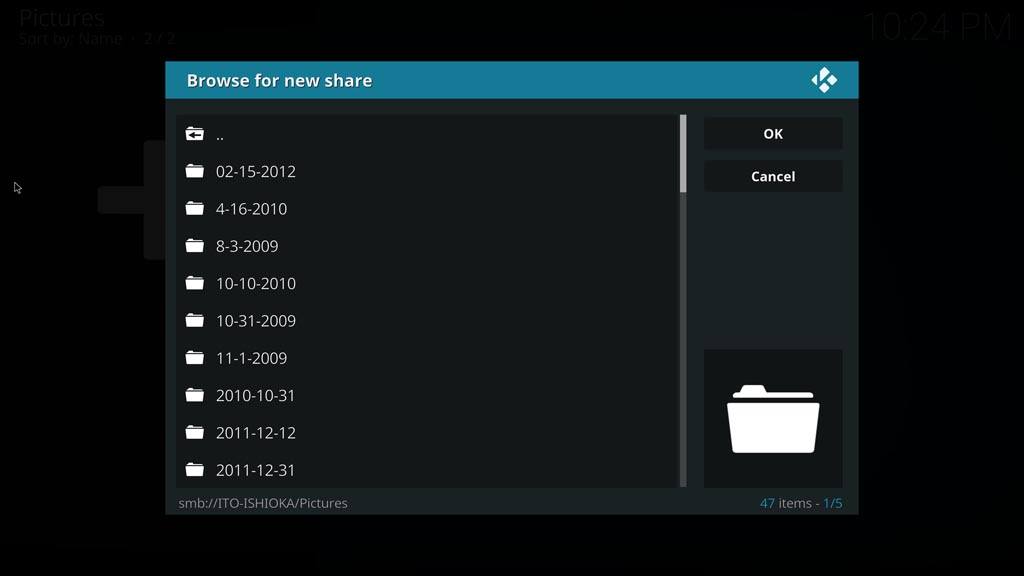
Navigate to the folder your pictures are stored in. For this example, I went to one individual folder without any subfolders. Kodi won’t list the individual pictures, only the folder names.
Once you’ve found the folder, click OK to continue.
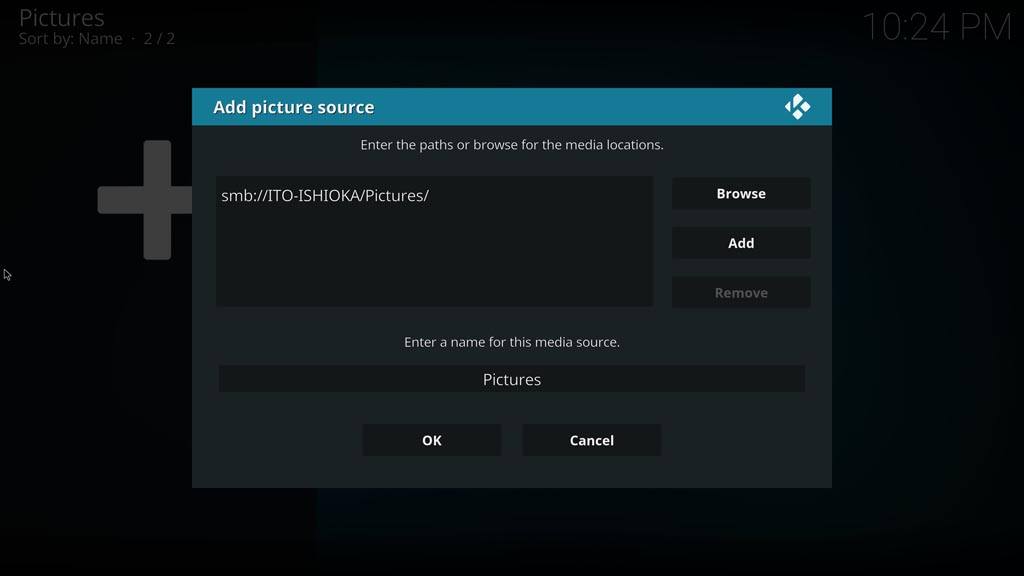
Once you click OK, you’ll be brought back to the Add Pictures source window and your folder path will be listed in the text box. Choose a name for your pictures and click OK to continue.
That will take you back to the main Pictures sub-menu and your folder will be listed on the menu. In my case, you can see my Sample Pictures folder listed between Picture add-ons and Add Pictures...
Kodi will then attempt to scan the folder to get a better idea of what kind of files are in that directory.
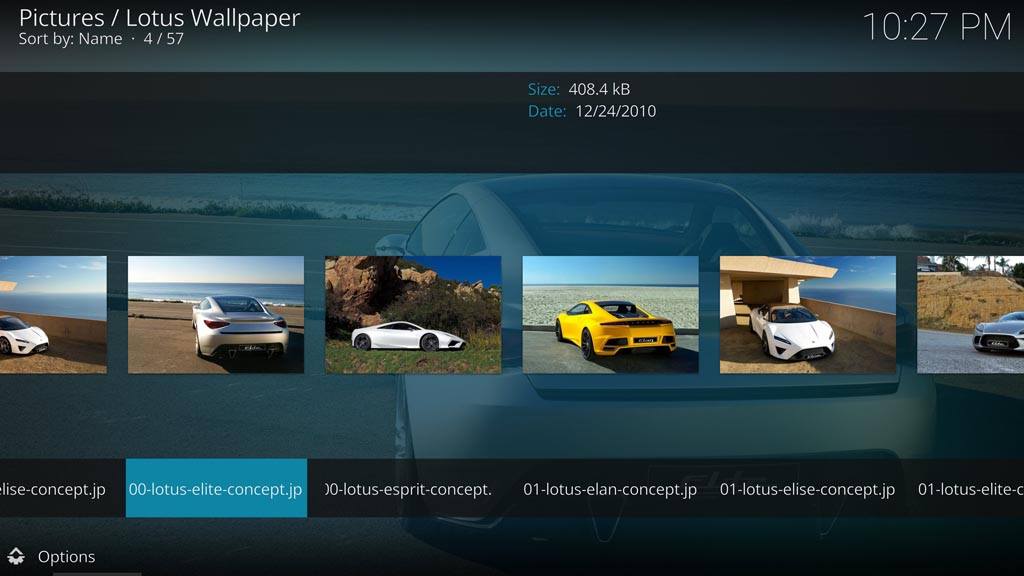
After the scan is complete, click in your new directory and take a look at your pictures library.
Pictures Sidebar Menu
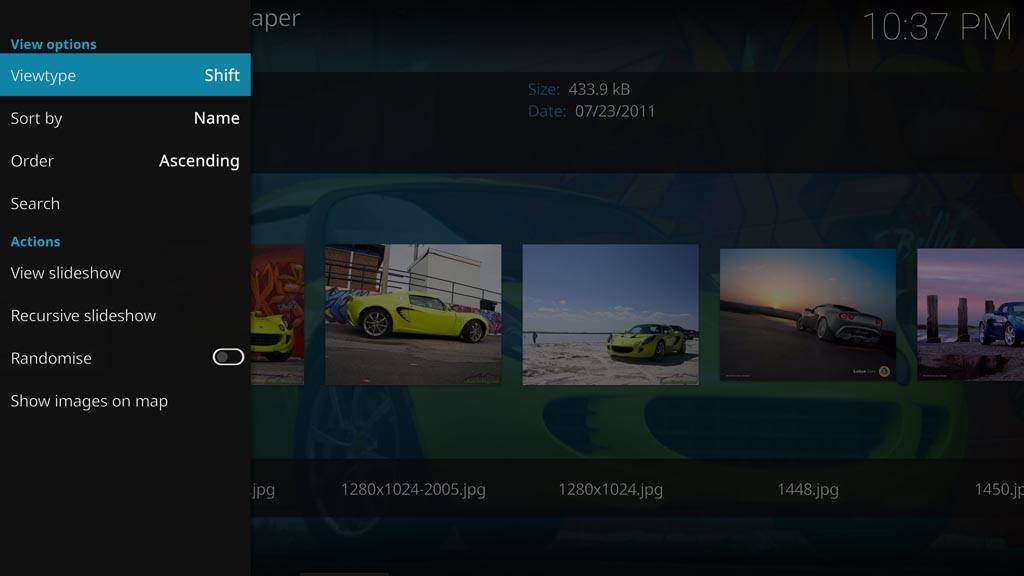
You can access the Pictures sidebar menu by moving the mouse to the left-hand side of the screen and selecting Options on the lower left-hand corner, or by pressing the left directional arrow if you’re using a remote control with a D-pad.
From the sidebar menu, you can change settings related to how you view your pictures and how you view slideshows. The View options are fairly self-explanatory, but I want to touch on the slideshow settings. They are listed under the Misc Options heading.
Actions
Once you’re in a folder that has pictures in it, you’ll see three things listed in the sidebar menu: Slideshow, Recursive Slideshow, and Randomize. The only settings change here is the toggle for randomizing the order your photos appear.
The Slideshow and Recursive Slideshow options will both (predictably) start a slideshow using the pictures in this folder. A Recursive Slideshow will also look in any and all sub-folders in the directory and include those images in the slideshow as well. Recursion really just means “include subfolders.”
Repository Add-Ons

Add-ons are at the heart of Kodi. In fact, many people would argue that without third-party developers creating add-ons and adding extra functionality, Kodi would be nowhere near as popular as it is today.
Kodi includes an Official Kodi Repository filled with hundreds of add-ons, which are supplied and supported either by members of Team Kodi or by developers they trust. You can find an add-on for just about anything you want – skins, streaming services, sports, live TV…the list goes on.
If that’s not enough for you, there are tons of unofficial repositories on the Internet you can download add-ons from. Many of these Kodi add-ons are of questionable quality and even more questionable legality, but if you Google a particular add-on, the reviews and comments will likely let you know which those are. I look deeper into add-ons in the following section.
How To Install Repository Add-Ons
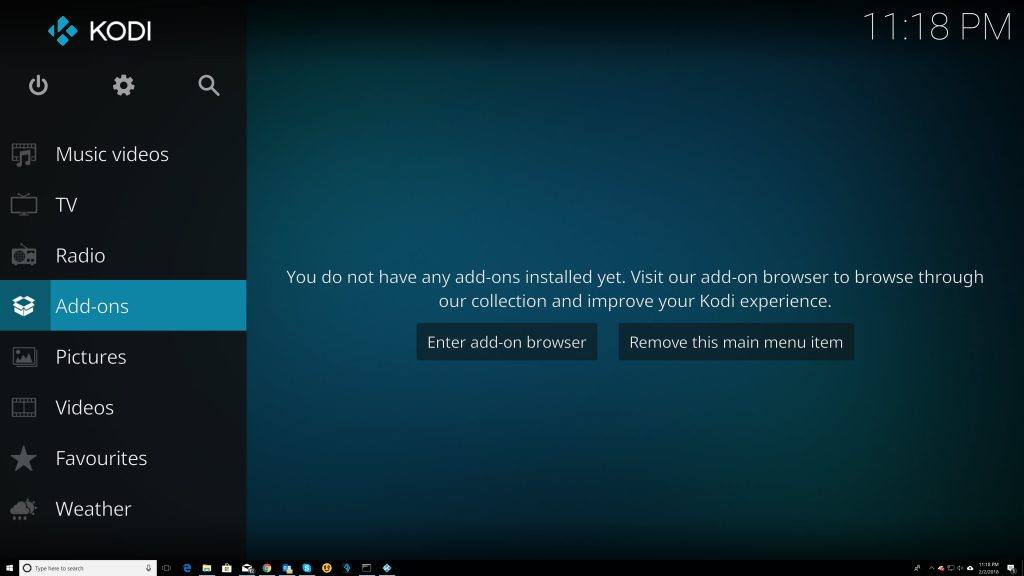
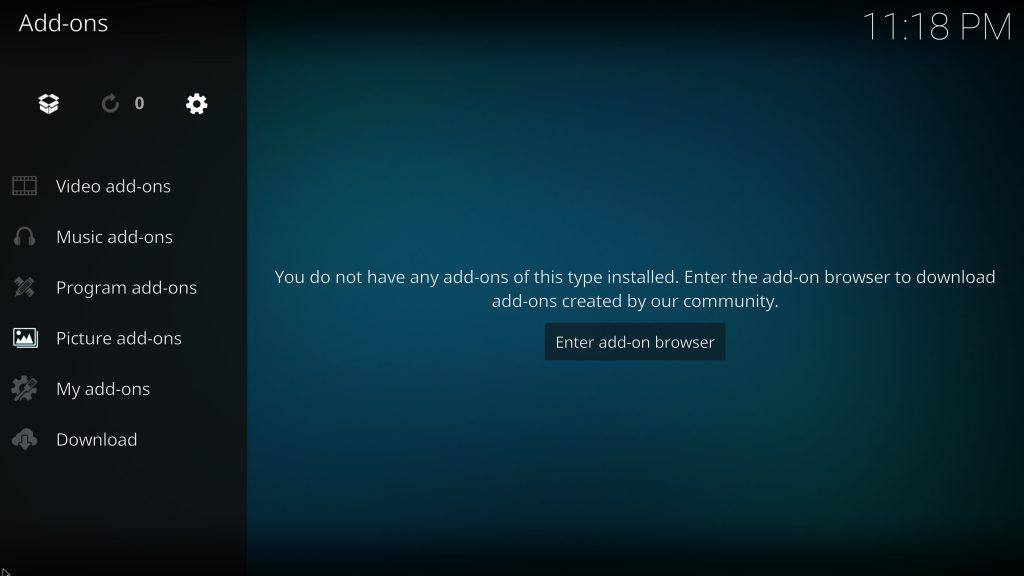
The easiest method for installing Kodi add-ons is to scroll down to the Add-ons menu and then Enter add-on Browser.
The Kodi Add-On Browser
Once you open the add-on browser, you’ll find a couple of different options.
- My Add-Ons: This will pull up a list of all of the add-ons, broken down by category, and whether they are enabled or disabled on this Kodi installation.
- Install from Repository: These is all of the add-ons available for installation in the Official Kodi Repository. We’ll go through the process for installing from here below.
- Install from Zip File: If you’re installing an add-on that’s not on the official list, you’ll have to download a zip file to your device and browse for it using this option. It’s a little more cumbersome, but it will let you install anything you want to.
- Search: If you know what add-on you’re looking for, or just have a general idea of the topic, you can enter it here and see the results.
- Recently Updated: This will show add-ons that have been updated recently.
For our purposes, we’re going to be installing one of the official video add-ons, so click on Install from Repository.
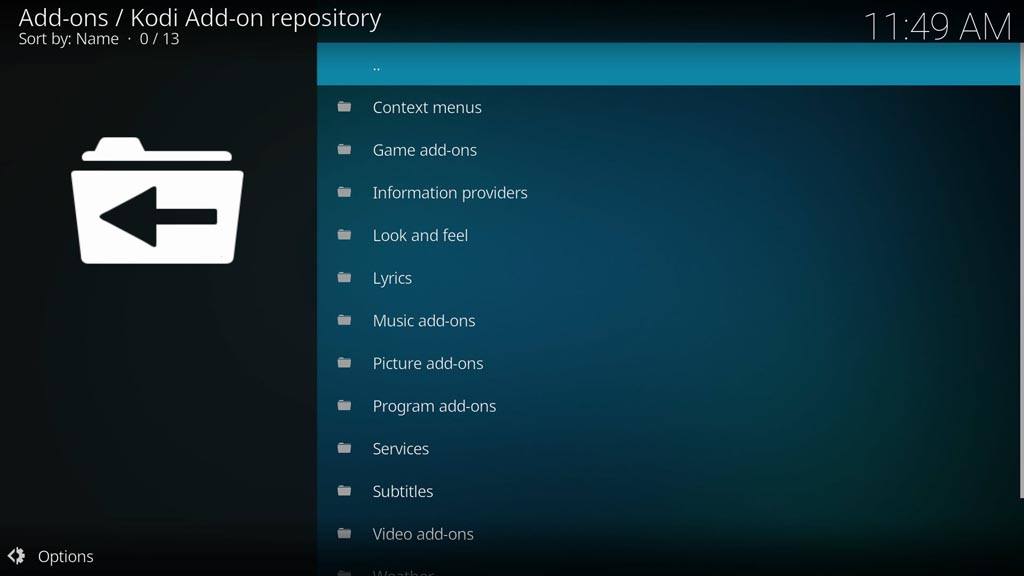
The Add-ons are broken down into several different categories like Context menus, Program add-ons, and Look and feel add-ons. We’re going to be installing a Video add-on.
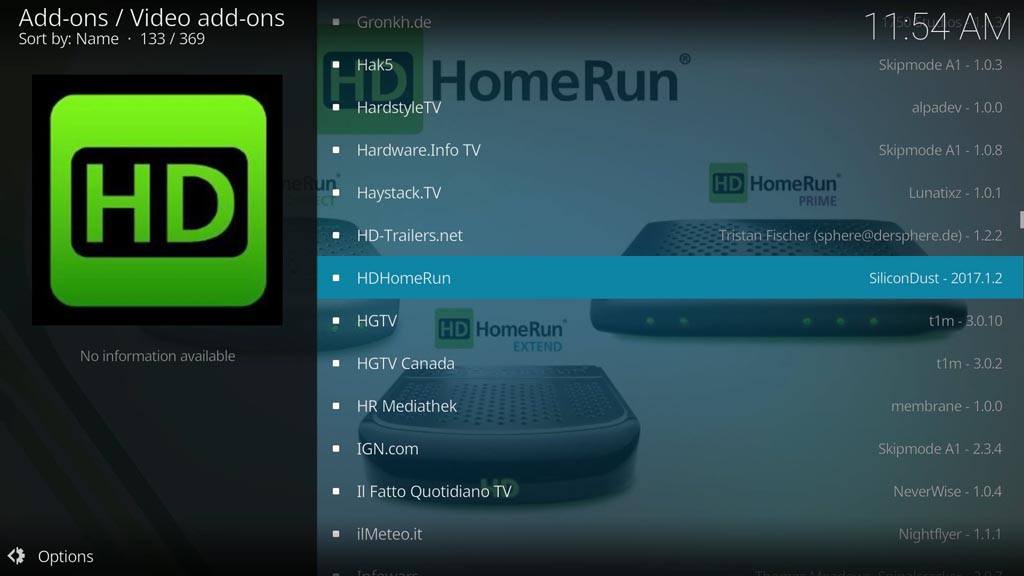
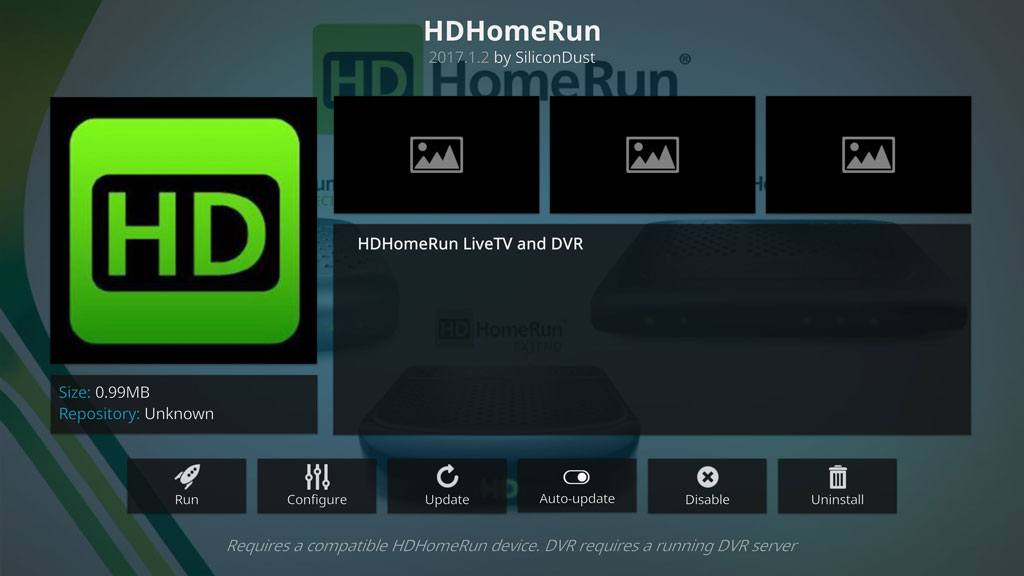
In this example, we’ll install the HD HomeRun tuner add-on. You can find out more about HDHomeRun in this article.
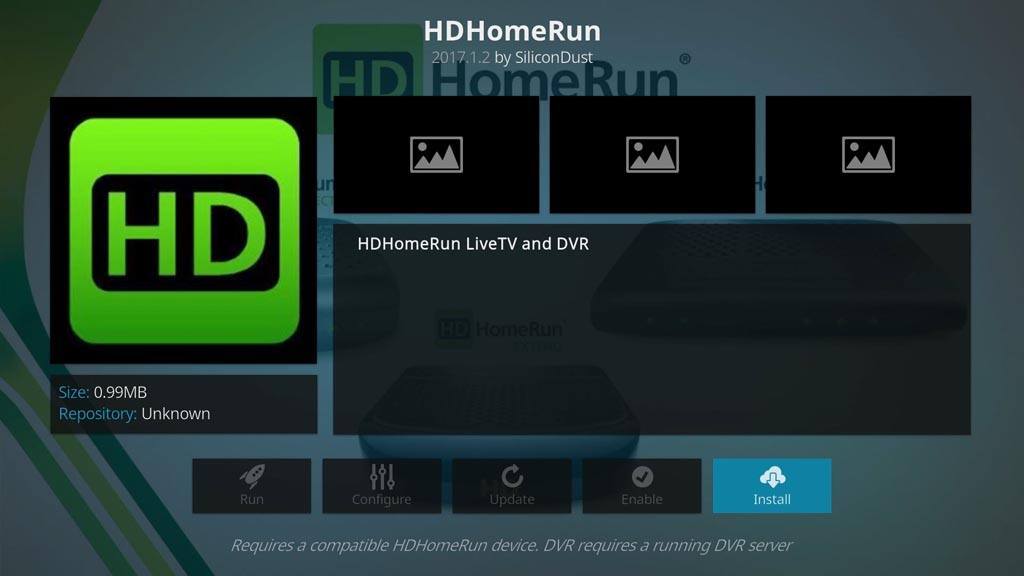
Once you select the add-on you want to install, you’ll be taken to a screen with a brief description and some additional options. Since we haven’t installed the add-on yet, most of those options aren’t available to us.
Click Install to continue.
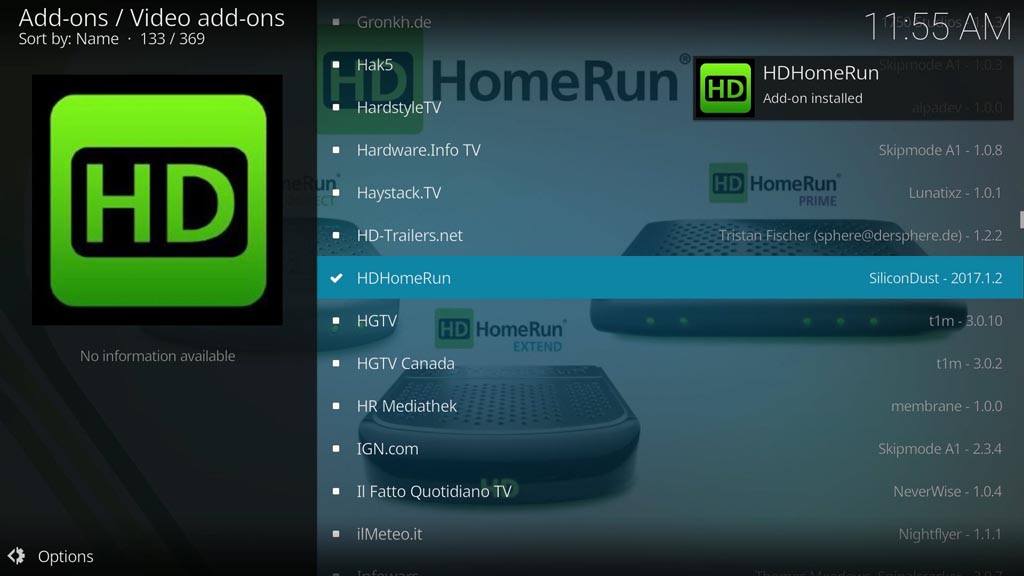
Once you decide to install an add-on, you’ll be taken back to the add-on browser and the installation will begin. You’ll receive a notification when the installation has finished.
Once that happens, click back into the add-on and all of those options that were grayed out on the description page will now be available.
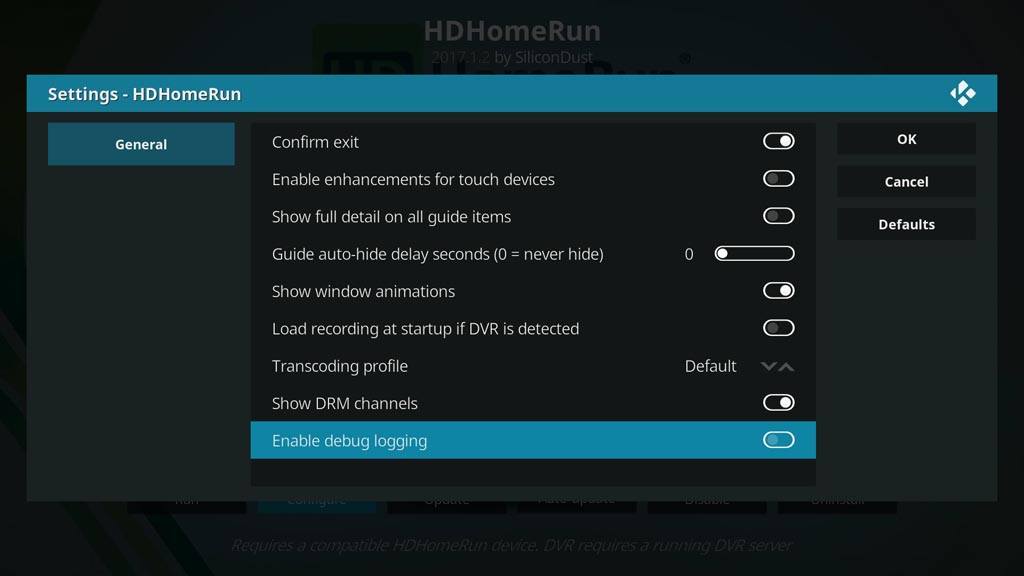
The one you’ll probably use most often is the Configure button. This is where you’ll find any options that the programmers of the add-on have enabled. Many add-ons won’t have anything available on this screen, so don’t be too surprised if it’s empty.
One final note: Kodi now gives you the option of configuring each add-on to either automatically update on its own or never update. Generally, I set my add-ons to automatically update Kodi because I want to be sure I have the latest version with new features or bug fixes. Occasionally, though, updating an add-on will cause it to break, so this enables you to find a version that works and keep it indefinitely.
Third-Party Add-Ons
While there are many great add-ons in the repository, you probably have heard of other add-ons that do amazing things that you will want to install. These can usually be found through Googling or visiting the various Kodi forums.
Just remember that when you are installing from the Repository, the team at Kodi has already done the work for you in ensuring that the app is safe and won’t infect your device or steal your data. When you install a third-party add-on, you need to do your own due diligence. Spend a bit of time looking around to see what people have to say about the third-party add-on you are considering. The Kodi community is pretty vocal and will send out warnings about dodgy add-ons.
Similar to your Android TV box when you want to install apps from outside the app store, in Kodi you have to authorize yourself to install add-ons from unknown sources (i.e. not the repository) before you can do this. It is a simple process.
Go to the cog icon, choose System, and scroll to the Add-ons tab. There you will find an option to allow add-ons from unknown sources, and make sure that it is toggled to “Allow.”
Next, you need the URL for the add-on that you would like to install. With this available, open the file manager in Kodi. Here you will have the option to add a source. Select where it says “none” and enter the URL for the add-on that you have decided to install; hit OK so that Kodi can download the source as a zip file. You will be asked to give a name to the source, so do that and hit OK again.
Now you can go to the Kodi home screen, click the open box icon in the top left-hand corner, and choose to install from a zip file. You can then choose the zip file that you just created. Depending on the size, you will likely need to wait for the installation to complete; you will receive a notification when it’s done. At this stage, you still haven’t installed the add-on! You have only installed the repository for the add-on, so there is still one more step.
Go back to the add-on menu and choose the option to install from the repository, then choose the repository that you have just added. You will be asked what kind of add-on this is, such as a video or a music add-on; choose whatever is appropriate, click install, and wait for it to complete the process.
Now it should all be ready. When you go back to the add-on menu, you should find your add-on under whatever category you chose
Weather
Just in case playing movies and music wasn’t enough, Kodi can also provide weather information.
There are six standard weather services in the Official Kodi Repository. Most are free to use, but some require registration on their websites to get the most out of them.
The official Kodi weather add-ons are:
- OpenWeatherMap Extended
- Weather Underground
- Yahoo! Weather
- Met Office
- Oz Weather (Australia-specific weather)
- Weather China (China-specific weather)
Each of these services has its pros and cons, so I recommend trying them out and seeing which you prefer. The basic installation process is the same for each, although as I mentioned earlier, you may need to go to the service’s website in order to register.
I’ll outline the installation for Yahoo! Weather below as an example.
Installing Weather Add-Ons
No matter which of the Kodi Weather add-ons you choose, the installation process will start the same way. From the main Kodi home screen, scroll down to the Weather section of the menu and you’ll see a screen that looks something like this:
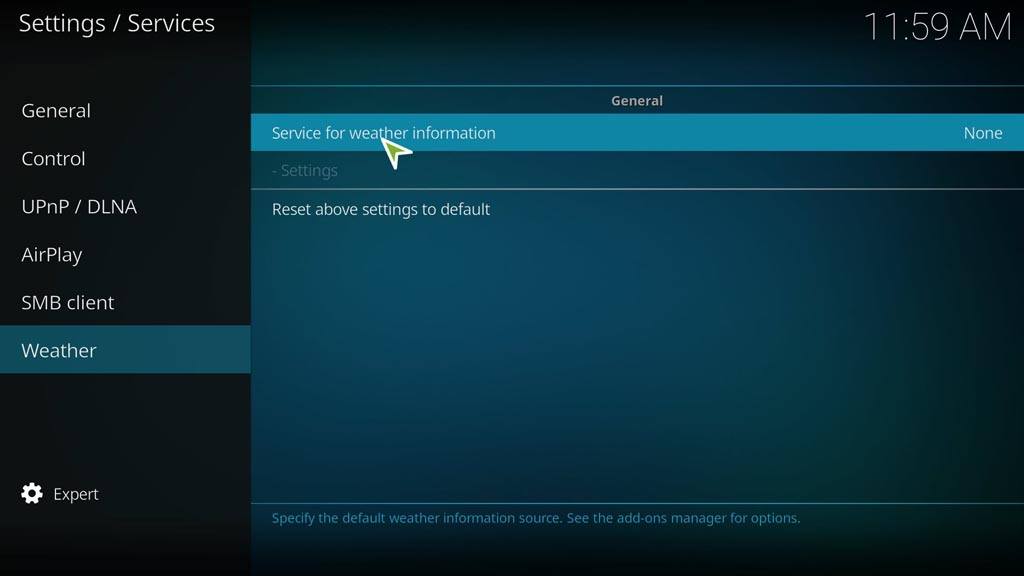
You’ll have the option to Set a Weather Provider or Remove this main menu item. At the moment, there’s not much here because we haven’t installed a service yet.

The first line in the main window will let you choose the Service for weather information. Click anywhere on that line to bring up the service selection screen.
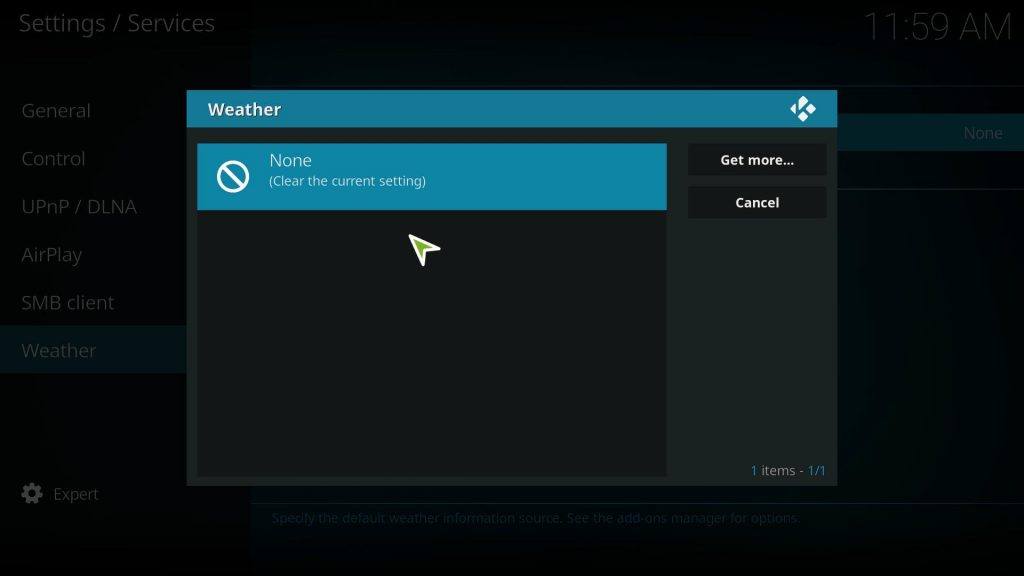
This screen will show you which weather add-ons you have installed on Kodi on this machine. At the moment there’s nothing here, but on the right-hand side, there’s a button that says Get more…
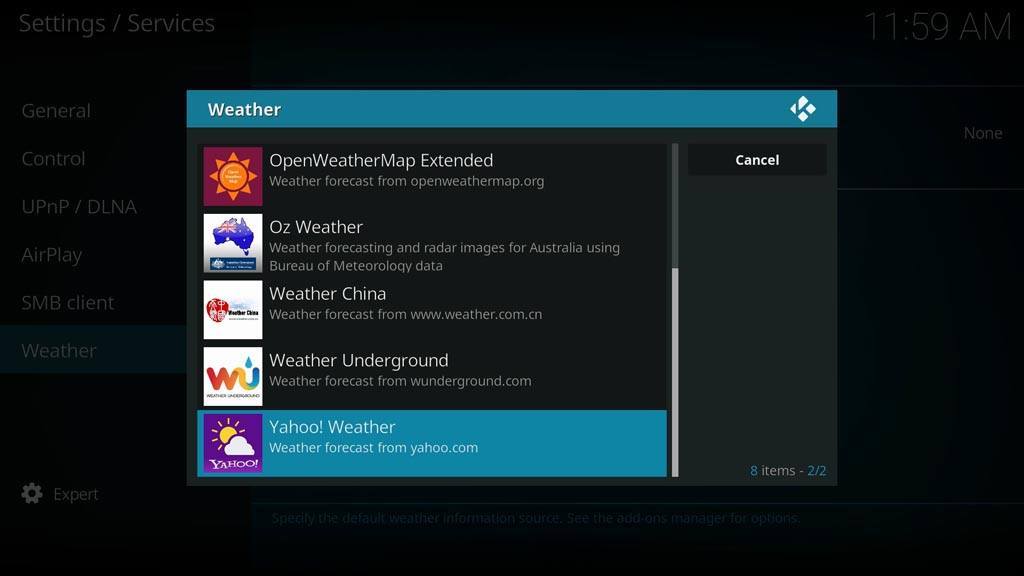
Here you can select which weather service you want to use. There’s no harm in trying a few of them out. You can only have one weather service active at any time, but you can switch back and forth between services very easily.
Installing Yahoo! Weather
Yahoo! Weather is one of the more popular Kodi Weather services because it is easy to configure and doesn’t require any additional information from the user other than what city you want the forecast for.
From the Get more… window, scroll down until you see the Yahoo! Weather add-on and click it to install. After a very brief installation process, you’ll be back at the Weather–Settings window, but Yahoo! Weather will appear on the top line as the Service for weather information.

Yahoo! Weather is installed, but it still needs to be configured for your particular city. There is a single Settings option on the second line of the main window, directly underneath the Service for weather information line. Click on Settings to pull up the Location Setup window.
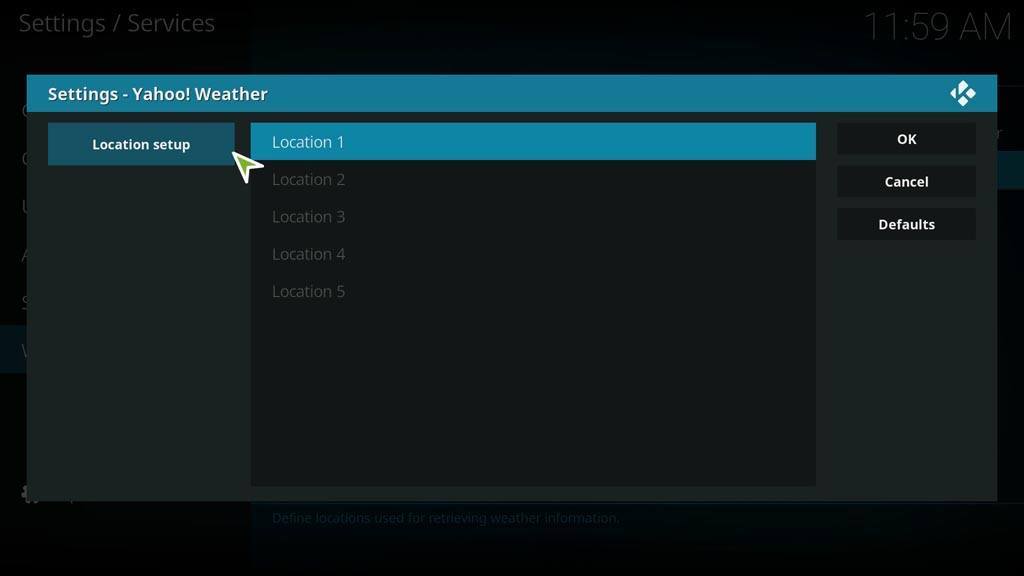
You can enter several different cities depending on how simple or complicated you want your weather forecast to be. For me, I’m only interested in the city closest to me: Orlando, Florida. To enter a city, click on the line that says Location 1.
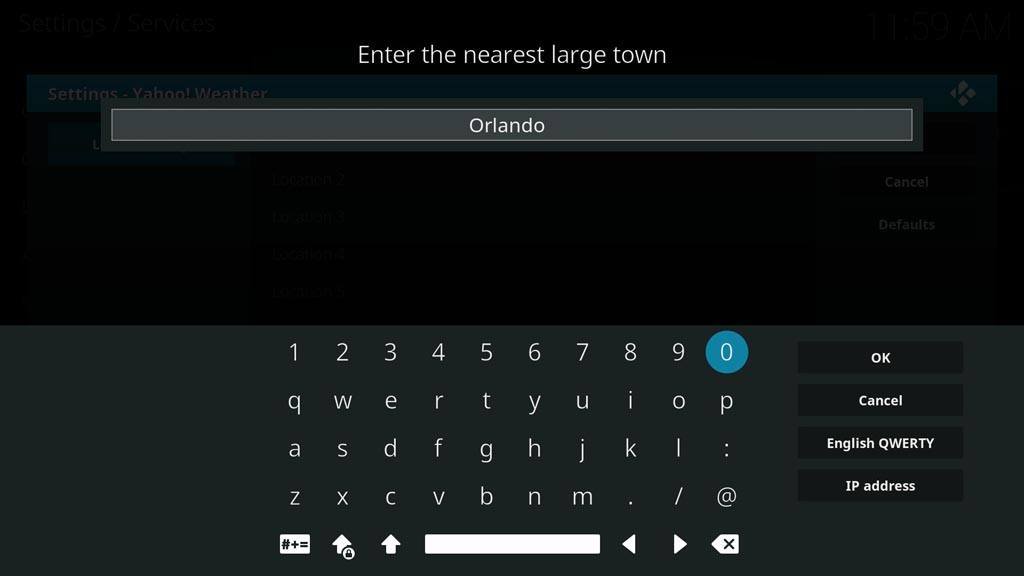
On the pop-up keyboard, type in the name of the city. I tried several different cities and small towns of various sizes and I wasn’t able to find one Yahoo! couldn’t recognize – even several ‘one stoplight’ towns I know.

If there is more than one entry for a particular city, Yahoo! will ask you to choose which one you meant. Since I’m not looking for Orlando in South Africa or Brazil, I chose the top entry: Orlando (Florida -US).
Once you make your selection, you’re taken back to the Location Setup screen. Repeat the process for as many cities as you want weather information for. Once you’re done, click OK to continue.
Getting Weather Information
Once you have a weather service installed, you can navigate to the Weather section of the menu on the left-hand side of the screen. Clicking on this option will bring up the most recent weather data, depending on your add-on choices.
Since we’ve installed Yahoo! Weather above, clicking on the Weather option now brings up the latest Yahoo! Weather information for my selected city.

Within Yahoo! Weather, the sidebar menu will let you scroll through multiple locations if you have them set up. It will also let you manually refresh the data and quickly jump back to the Weather Settings menu.
Kodi Builds
While a lot of people quite enjoy the process of setting up and personalizing Kodi, not everyone does. Some people just want to install and start streaming from online sources. If that is you, you do have another option.
Instead of personalizing your Kodi experience yourself, you can install a Kodi Build. This is basically installing a copy of someone else’s Kodi setup. They have already installed Kodi skins to control the UI and add-ons to bring in the best content, and rather than do this yourself, you just replicate theirs. This only brings in their layout, not their content, so there is no question of it not being legal.
These Kodi builds are easy to install; you install them just like any other third-party Kodi add-on, except that they need to be installed as a system add-on and you will need to restart Kodi after the installation is complete.
You can find our recommendations for the best Kodi builds here, plus further instructions for installation.
What About A VPN?
Before you start downloading content on Kodi, you should really set yourself up with a VPN. This is not just to protect your identity and anonymity if you decide to dive into the more legally dubious areas of Kodi!
A VPN helps you unlock content that might be geofenced, such as Netflix USA (if you aren’t currently in the US or are traveling) or BBC UK. It also encrypts your data to protect it against hackers. Think you don’t have anything of value on your TV box? Think again. What about your Netflix password and payment details?
These are only some of the very good reasons you should be using a VPN with your Android TV box. If you want to dive in deeper, you can read more here.
If you are using Kodi, not just any VPN service will do. Not all VPNs support streaming or P2P file exchange (torrenting). Also, while all VPNs will cut your internet speeds, some cut them more than others. While this might not matter much when you are browsing the net, it will when you are streaming 4K content.
Here are my top three VPN services I suggest you use for your Android TV box with Kodi. All of them:
- Support streaming and torrenting
- Maintain internet speeds fast enough for 4K streaming
- Use 256-bit AES encryption technology
- Have a no-logs policy, which means that none of your personal data or online activity is recorded anywhere
- Feature a killswitch to cut your internet connection should your VPN drop out for some reason
1. CyberGhost VPN
- $72 for a one-year plan for up to seven devices
- 6,500 servers in 90 countries
- Unlocks all major streaming services
Click Here For the Latest Price
2. NordVPN
- $84 per year for six devices
- 5,500 servers in 60 locations
- Special packages and support services for businesses
Click Here For the Latest Price
3. IPVanish
- $77.99 per year for ten devices
- 1,400 servers in 75 locations
- Fastest VPN speeds available
Click Here For the Latest Price
For more in-depth reviews, read our recommendations for the 10 Best VPN Services for Kodi.
More Resources
Are you interested in finding out more about Kodi, or reading my other articles for some tips, tricks, and tweaks?
Take a look at these to help you get started:
- Do I need a VPN for Kodi?
- How to make Kodi look more like Netflix
- How to fix issues when Kodi is zoomed in too far to see the screen
- How to fix Kodi buffering issues
- Kore: The official Kodi remote
- Yatse: One of the most popular Kodi remotes
- 10 “Must Have” features for your next Android TV Box
FAQs About Kodi
Should I Use Kodi?
Kodi is an excellent piece of software if you want to be able to control all of your media in one place, including streaming services, and share that media across your devices. With Kodi, you can network your television, computer, tablet, and smartphone, and watch all the same media. Where you left off on a movie on your television, you can pick up from that scene on your smartphone.
Kodi is one of the easiest ways to customize and streamline your viewing experience. You can access all of your favorite content where you want it, without having to continuously switch applications to engage with specific content. Kodi can play any file type, so there are no restrictions.
Is Kodi Legal?
Using Kodi is perfectly legal; however, you can choose to do illegal things with Kodi, and those things remain illegal. For example, there are Kodi add-ons that will allow you to stream copyrighted content for free. If this is illegal where you are, then it is still illegal to do with Kodi, even if it is possible.
How Do I Start Kodi?
Depending on what kind of device you are using, you can either download Kodi from their website or download the app from your app store. If there is no app available for your device, you can also download the APK from their website.
When you download Kodi you will find yourself with an empty library, so you will need to start adding media from your own library and installing add-ons to let you access streaming and other media services.
How Do I Use Kodi Properly?
Making the most of Kodi is all about getting it set up to do what you want. Do you want it to be able to pull up playlists based on your moods? Do you want to switch easily and browse all of your streaming libraries at the same time? Are you all about bringing gaming to the big screen?
Kodi is infinitely flexible, so the key to using Kodi properly is to figure out what you want to do with it and then check the forums for advice on add-ons and setup. The Kodi developer and user communities are large and generous; there are a lot of people out there willing to help you and make recommendations.
How Do I Put Kodi On My PC?
Setting up Kodi on your PC is simple, and starts with downloading the latest version of Kodi from their website and then running the simple installer. If you need to upgrade, it is not necessary to uninstall your existing versions of Kodi and you can install the new version on top if you are happy with your setup. When upgrading, start by backing up your app data/Kodi directory.
How Do I Fully Load Kodi?
Because it is a legal gray area, it is now pretty rare to get fully-loaded Kodi boxes. They have also become less popular, as fully-loaded boxes tend to come with a lot of extra stuff you don’t want and with add-ons that just don’t work.
You are better off determining what you want – sports, gaming, movies, TV shows, music – and then going onto the Kodi forums to find the best ways to load these onto your Kodi box (or using this in-depth guide!).
Conclusion
This is by no means an exhaustive guide for installing Kodi and getting it set up to use. To do that would likely double or triple the length of this article. There were topics I touched on only briefly and others that I didn’t mention at all.
However, this guide should help you get a Kodi installation up and running from scratch and get you to the point where you can start enjoying your media.
If you’d like further resources, one of the best is the Kodi section of this website. My advice is to follow this guide, but then start playing around. Tweak. Modify. Ask questions. There’s so much that Kodi can do. Enjoy!
If you have any comments or first-hand experiences with setting up Kodi boxes, please post them below or share your pictures via our social media.






Hi Tim…I was blown away when I found your information….Have not seen anybody do 1/2 as much to try and explain what is involved. I have an ANdroid box which I have had 4 at leaat 3 years and it has the 4.2.2 version of Kodi which does not work very well at all and never really did. How do I erase and update this on my current box. I need hand holding as I am not that savvy on tech stuff…Thanks in advance for any help you can provide…AJR
Hi!
Thanks for the guide! I’m an intermediate user of Kodi and agree that it is really a learning curve using Kodi but I am stumped about my subtitles in Kodi. Recently I have not been able to get ANY subtitle service to work in Kodi! I know how to add subtitle services and download them while watching content on Kodi. Been using subtitles for years in Kodi but now when I try to download them I get an error & I’ve noticed that the movie titles are showing up as gibberish (letters and numbers ending with the extension .m3u8) When it was actually working the movie title would be the name of the movie followed by the extension .srt This is strange because it happens on every Kodi device so it’s not the devices. If I can’t figure it out I may have to stop using Kodi because subtitles are a vital component to Kodi for me!!
Thanks!!!
my kodi wants me to enter my city name. It won’t let me go any further. I tried the name of my town and it would not accept it. How can I pass this message and go on?
Thanks for easily showing how to switch between different weather services mine is stuck and can’t use .
Good article for everyone
Good article for everyone